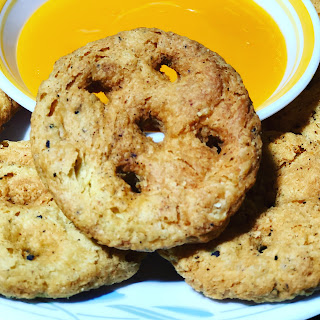
Sarasiya Khaja also known as Khajli in some gujju homes :)
If you ever been to Gujarat during Mango Season time, you would have definitely tasted Sarasiya Khaja with Mango pulp (Ras). I grew up eating them and it has always been my favorite having with not just Mango Ras but also with Chai in the morning or just as a snack by sprinkling some lemon on it.
Surat is famous for Sarasiya Khaja and every time I visited India, my Grandfather and Dad always bought it from there. I never thought of even making it at home. After marriage, my mother in law made it once and I never thought it would taste as good as I always had in India. After the first bite, I just couldn't believe how delicious it tasted and so much lighter and better than what I always had in India.
The shop ready-made ones are always so oily and I believe they have to sell it that way as it would weigh more and thus they can make more profit ;). I haven't seen a recipe online where they would show you how you can ensure to drain as much oil as possible to make it lighter and flakier as the recipe my mother in law has. We are both happy to share this recipe with you all. Before I got married, my mother in law use to sell Sarasiya Khaja as she ran catering business but now She wants to ensure that everyone can make it at home and not worry about buying it from shops as we can control the oil content at home and homemade is definitely 110 times better :)
WATCH the Video:->>
Ingredients
Step 1:
Self-rising flour – 4 cups
Crushed Black pepper – 2 teaspoons
Jeera (Cumin) powder – 2 teaspoons
White Chili powder – ½ teaspoon
(optional)
Lemon Juice – 2 tablespoons
Salt to taste
Water – 200 ml
Oil – 200 ml
Turmeric powder – 1 teaspoon
Step 2:
Water – 100 ml
Butter – ¼ cup (other option Oil – ½
cup)
Oil for frying - any oil (preferred
Mustard oil)
Instructions/Method:
1.In a large mixing bowl, take 4 cups
of self-rising flour. 2.Add 2 teaspoons crushed black pepper,
½ teaspoon Turmeric powder, 2 teaspoon Jeera (Cumin) Powder, ½ teaspoon White
Chili Powder, 2 tablespoons Lemon Juice, 200 ML Oil, 200 ml warm water and salt
to taste. 3.Mix well so all the spices blend in
and do it for good 3 to 5 minutes. 4.Now divide the mixture and set
aside. 5.Take a wide pan and heat it on low
to medium flame. Add 100 ml water and ¼ cup butter. You can substitute the
butter by adding only ½ cup of oil. 6.Stir until butter melts and it
starts bubbling. 7.Add half of the dough mixture and
cook on medium flame till it looks like halwa (sheera). Take off the stove when
it's done and allow it to cool for about 10 to 20 minutes. 8.Add the cooked mixture to the other
half in the large mixing bowl. Knead
the dough and ensure to mix well. Also, add more water ONLY if the mixture is
too hard and dry. The consistency of the dough should not be too hard or too soft. 10. Divide the dough into small parts
and knead well. 11. Now, divide the dough into equal golf
size balls. (you can make bigger if you like ) 12. Roll the balls like puris about 4-inch
diameter, 1/4 inch or less thick and with the help of small coin or your
fingers make some cut or holes in puris, so it cooks well inside too. Please
ensure you have proper holes as the oil needs to get through them for it to be
cooked well. 13. Do the same with the rest of the
puris and set them on one large plate. Ensure they do not overlap each other
completely 14. Take a wide frying pan and heat oil on
low to medium flame.Drop the khaja one
by one ensuring you leave enough space between each and for them to float in an oil well. 15. Drop oil on each of them while it's
been fried. Please note that it takes around good 10 to 20 minutes for khajas
to be cooked completely. The cooking time really depends on your stove. 16. Flip the khaja on the other side once it
gets light brown and feels heavy enough for it to be flipped. 17. Fry on another side till it looks
light brown and both sides look completely cooked with the same color. It should
look flaky. 18. Drain them one by one on a wired
rack followed by kitchen towel paper. 19. Now to ensure your khajas does not
contain so much oil and gets very light and flaky. Pre-heat oven to 175 f. Put doubled kitchen towel in a foil tray and put the khajas in it and put it
in the oven. Turn the oven off once it reaches the temperature. Let it sit
in the oven for good 4 to 6 hours or overnight (preferred). However, ensure that every two hours, you would change the oily kitchen towel which is under the khajas, and put the Khajas back in the oven by putting some new kitchen paper towel underneath. You can do this step of changing the kitchen paper towel for about 2 to 3 times.
20. After 4 to 6 hours or the next
morning, they are ready to be eaten with your morning chai or lunch/dinner with
Mango Ras 😊.
Note: Please ensure you change the kitchen
paper towel every 2 hours to ensure the khajas drain as much oil as possible.
You would be surprised how much oil would be drained and how light and flaky
your khajas would be. Also, ensure you put proper holes in
the khajas after they are rolled so the khajas gets cooked evenly and properly.


Comments
Post a Comment